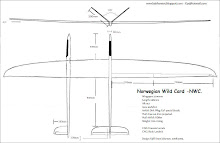
Wednesday, February 25, 2009

Tailplane fitting.


Just finished gluing the tailplane seating in place. Spent 9 hours over 2 days to make the jigs for 2 glue joints that took me 10min!!! -Did a small mistake with the carbon plate that holds the two steel joiner rods in the correct place. The result was a night with little sleep and a lot of thinking... :( -In the end the tailplane mount got 3mm. slimmer. This should not matter as long as I can fit the linkages inside. The angles in all 5 axes was checked with a digital inclinometer. The V-angle between the halves is 103 degrees. Now I have to make the tail mount area pretty again... To quote my German friends: "spachteln und schleifen... und spachteln und schleifen..."


Project documentation starts at December 2008...


Monday, February 23, 2009

Detail drawing of wing center.

Just a 3d-drawing of the wing center section with ballast tube and joiners fitted.

Thursday, February 19, 2009

Some pics of the finished joiner mould and fuselage positive.


The joiner mould is ready for wax, just waiting for EMC Vega to deliver it... -It came out ok, the finish could have been better, but hey, it`s just the joiner... Also a picture of the fuselage positive with tailplane held on with some tape. Next up is tailplane mounting. I will make a jig for this to make sure it`s going to be absolutely straight.

Btw. The 2k. paint problem is solved. But I need to do some testing before useing it as surface coat on my positives.

Tuesday, February 10, 2009

Joiner mould.


Here one can clearly see the 3mm plexi plate mounted under the joiner postive, this is used as a positive for the compression tab.

Just finished one half of the joiner mould. Th mould is made with a Poraver back filling. First time I`ve done the fiberglass layers on top of the Poraver in one go, just after adding the Poraver. I don`t recommend this.... It was really messy..
The layup is:

- 2 layers mould gelcoat F200.
- A coupling layer of epoxy, milled glassfiber and cotton flock.
-1 layer 110g glass.
-1 layer 163g glass.
-3 layers 280g glass.
-2 cm.Poraver.
-3 layers 280g glass.
-1 layer 163g glass.

In a couple of days I will remove the parting board, and clean up this part making it ready for moulding the other half in the same way as the first one.

-The mould is made with a compression tab, just like most professional joiner moulds are made. (I.E not split down the middle of the joiner.) -This demands that the side walls of the joiner is completely straight, with no undercuts. If not, the joiner would be extremly hard to remove from the mould. We will see...

Monday, February 02, 2009

Just a small update about the progress so far...

I`ve just gave a go for Bodo Landeck to order the materials for the wing positives , and start milling as soon as he can find time for it. The positives will be milled in a material called Ebaboard 60. The positives will be backed by a steel frame made from 30x30mm. square steel tubing. This is to prevent them from warping...

My intention at first was to use a material called Neucron 1001. This is a directly polishable material, that would have saved alot of work. The reason for not chosing this material is that the boards are only 1200mm. long and needs to be glued together to make a long enough board for the positives. This will create a join line in the surface that will show on the finished mould. I`ve had bad luck in the past trying to polish away imperfections in a mould... The Neucron is also very heavy and expensive. Beeing a student, cost is an issue.

The Ebaboard 60 needs to be painted with 2k acrylic paint and polished before moulding. This is a problem, because 2k. acrylic is illegal in Norway and really hard to get by. If anyone of you know how to get hold of some, please drop me a line at: f3x-at-hotmail.com -On the other side, the ebaboard is cheaper and alot lighter... -As soon as Bodo starts to mill and send me some pictures, I will post them here.